


Imagine the beauty of this. Someone filled out a lead capture form on your website, their information is automatically entered into your client database, a follow-up email was sent, AND you have a reminder waiting for you when you get into your email that tells you what to do next and you didn’t have to do a thing. I’m going to show you how to do all of that in this blog post using a software called Dubsado (if you’ve never heard about it, I’m going to tell you about it too.)
Here’s What We’re Going to Talk About Today
- What Dubsado is and if it’s right for you and your business.
- A simple way to test drive it for free BEFORE you do a whole system set-up.
- The importance of efficient lead management.
- How to set up my simple test drive.
- Why you might want to upgrade to the Premium plan in Dubsado.
- How to save 30% if you do that.
Let’s dig into it!

Hey creative entrepreneurs, if you want to create an amazing client experience AND stop doing so much admin work in your business, it’s vital to ensure your lead management processes are streamlined and efficient. That’s where Dubsado can step in to assist you in capturing, organizing, and nurturing your leads effectively. The bonus is, that you can try its capabilities for free to see if it is a good fit for your business with the simple test drive that I’m going to outline today.
What is Dubsado?
I’m not going into a full description here. If you want to read more about it, I wrote a full blog post that you can read HERE. The short answer is Dubsado can help you manage one-on-one clients and and automate your client journey from lead to onboarding all the way to offboarding. Here are a few things it can do…
- Schedule appointments (and send confirmation emails and reminders for those appointments.
- Capture lead info and add it into Dubsdao (think of it as your new client database.)
- Send and allow clients to digitally sign contracts.
- Send invoices (and send payment reminders.)
- Automatically follow up with emails/forms.
This is a REALLY short list of my favorite features. It does A LOT more. Plus, you can string actions together in automations that Dubsado calls workflows.
Is Dubsado Right for Me and My Business?
Dubsado is designed for one-on-one service providers (like wedding photographers, website designers, hair and make-up specialists, home stagers, accountants, etc.) If you really want to learn if it’s a good fit for you and the way you do business, set up a free 15-minute Systems Strategy Call with me. I’ll help you figure it out.
Take it for a Test Drive
I totally recommend setting up lead management in Dubsado BEFORE you start working on a full set-up (or having me set it up for you if you aren’t sure if you like it or not. It gives you a chance to experience the automation and see how it can help you without committing to the software 100%. It also gets you into Dubsado frequently so you can start to get more familiar with it. (It’s tough to get familiar with any software if you aren’t in it much.)
In this guide, I’ll take you through the process of setting up a lead capture form in Dubsado, offering insights and tips to make the most out of this powerful tool. I’ll also show you how to set up a super simple automation that you’ll love because it’ll take some work off your plate with just a few minutes of work.
Ready to get going? Let’s get started…
The Importance of Efficient Lead Management
Before diving into the specifics, let’s understand why optimizing your lead management is crucial. Especially if you’re busy (or in the middle of the busy season), time is of the essence. Managing leads efficiently allows you to:
- Quickly Respond: Timely responses can make or break a potential client relationship.
- Track Progress: Keep a record of all interactions and easily track where each lead stands in your conversion process.
- Keep up with Communication: Dubsado allows you to see all of your email communication for each lead. You’ll never have to wonder what you’ve sent (or not sent) to a lead again.
- Leverage Data: Gather data on how your leads find you, helping you optimize your marketing efforts.
Steps to Efficient Lead Management Using Dubsado’s Free Software Trial
Let’s walk through the steps to create a lead capture form in Dubsado. This step-by-step guide will help you craft a form that’s not only efficient but also visually appealing and mobile-friendly. If you haven’t signed up for Dubsado yet, click HERE.
Step 1: Create a New Lead Capture Form
Login to Dubsado. From the dashboard, head to the left menu and click on “Templates.” Scroll down to “Forms” and then to “Lead Capture Forms.”Click the plus sign to create a new lead capture form. This will present you with a basic lead capture form. This is a great starting place! It makes it super simple to get a basic lead capture form created and ready to go in minutes.
Example of a Dubsado Lead Capture Form for Home Staging
Step 2: Customize Your Form
- Add the appropriate types of fields to collect information from your leads that you want at this stage in their journey.
- Keep it Simple: For your initial lead capture form, simplicity is key. Avoid overloading with images to maintain fast load times. Limit questions to ensure that more leads complete the lead capture form.
- Organize your fields in one or two columns for a clean, easy-to-navigate form: Using two columns can help your form feel less overwhelming.
- Mobile Optimization Tip! If you’re using two columns for your form, add a new two-column container or each pair of fields. (watch the video below to see what I mean.)
- Ensure you have fields for the lead’s first name and email address. (These are required for a Dubsado lead capture form.)
- Useful Additional Fields: Consider adding a Project Tracking block to find out where your leads are coming from so you can double down on those marketing efforts.
Step 3: Remember to Map Fields
Each short answer and date field can be mapped to fields in the project or client record. (Dubsado has client records and project records. They’re exactly what they sound like. The project record keeps information for a specific project. A client can have multiple project records, but just one client record.)
Step 4: Set Lead Capture Form Settings
I’m putting this here for continuity, but you’ll actually want to circle back to it once you’ve created the workflow below because you’ll need to connect the workflow in the lead capture form settings. Once you’ve completed your lead capture form and created your workflow, come back up here to set your Lead Capture Form Settings.
Lead Capture Form Setting Steps
Step 1. Set your workflow.
Step 2. Write the “Thank You Message” that pops up when your lead fills out your lead capture form.
Step 3. Add a redirect URL (the webpage you want to send a lead to after they fill out the form.) (optional)
Step 4. Set the project status that you’d like to automatically assign to new leads.
Step 5. Set the project title that you want to automatically assign to new leads after they fill out this form. Tip: Use the smart fields to assign the client’s name or other information. (If you don’t do this, you’ll end up with a bunch of clients with the form name as their project name. That’s a big mess.)
Step 6. Assign a team member (optional). If you’d like to automatically assign a team member to a new lead, you can do it here.
Step 7. Not really relevant for this, but you can set the expiration date and password-protect the form in this area as well.
Next: Click the pallet icon to set the question styling (change the font, font size, and font color, add top and bottom padding, change the Submit button text, or add custom CSS.
Automating Your Lead Management with Workflows
As promised, we’re about to save you admin time and make your lead management even more efficient. In just a few minutes of setup, you can create an automation that will help organize your leads and automatically reply to new leads so you don’t have to jump to follow up with new leads in the middle of family dinner or bedtime stories.
Let’s walk through how to set it up.
Lead Capture Workflow Steps:
Step 1. Write the canned email that you want to send to clients after they fill out the form.
Ex. Thank you for connecting with us! We’re excited to meet you! We’ve received your form and will be in touch shortly. In the meantime, here’s a great article that we wrote on choosing a (fill in what you do). Add a client testimonial or two to the bottom.
Step 2. Create a workflow.
From your Dashboard in Dubsado, click Templates, Workflows, and then Create a Workflow.
- Quick Follow-Up Email: Sends a quick follow-up email to thank the lead for reaching out and provide them with more information about your services. (Educate leads and improve your conversion rate, by recommending links to helpful content or showcasing testimonials in the email. This personalized touch adds value and guides them through their journey with your brand.)
- Follow-Up Task: Create a task to remind yourself to follow up with the lead after they’ve received the initial email. Following up is crucial for nurturing relationships and potentially converting the lead into a client. This may not be where your lead workflow will end eventually, but it’s a great place to start experimenting with Dubsado and workflows.
To see what this looks like inside of Dubsado, check out the picture below.
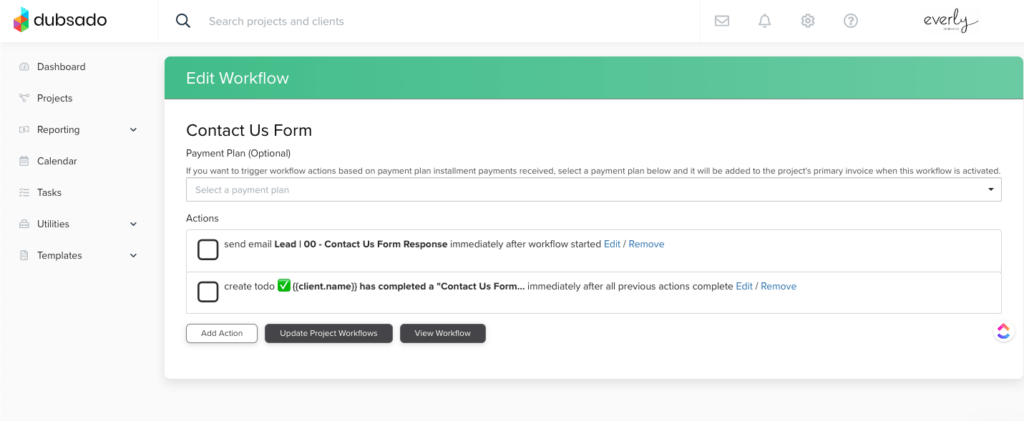
By implementing this automated workflow, you’ll be saving precious time, ensuring no lead is left unattended, and ultimately increasing your chances of converting leads into happy clients.
Ready to automate your own lead capture process? Let’s streamline your workflow and optimize your lead management. Book a free 15-minute strategy call with us, and we’ll help you create your own customized lead capture workflow and more.
Why Upgrade from the Free Software Plan?
While Dubsado’s free plan is excellent for managing up to four leads, upgrading unlocks more potential. With the Premier plan which is just $40 per month, you can manage an unlimited number of leads, create workflows, and enjoy a seamless lead management experience. Plus with my link, you can save 30% off your first month or year. Click here to save 30%.
Ready to upgrade? Visit the Dubsado Pricing page to explore the best plan for your business.
Note: Dubsado is free for up to four leads. Visit the Dubsado Pricing page for detailed pricing information.
Celebrate Your Lead Management Wins
In this guide, we’ve showcased the importance of efficient lead management, shown you the steps to set up and embed a lead capture form, and managed leads using a lead capture workflow all with Dubsado. The upcoming busy season will be a breeze as you implement these strategies and make the most out of each lead that comes your way.
As you navigate this process and implement efficient lead management, remember to celebrate your progress. Even if you’re not where you want to be just yet, each step forward is a triumph.
If this post resonated with you and you’re ready to elevate and automate your client experience, (plus get a HECK of a lot of admin work off your plate), let’s chat. Book a free 15-minute strategy call with us. We’d love to help you streamline and optimize your lead management for the upcoming busy season in your business.


")


+ view comments . . .