

")

& Stay Out of the Spam Folder
Improving your email deliverability is a big deal. Are you sure that the proposals and emails that you’re sending through Dubsado are going into someone’s inbox and NOT to their spam folder? It’s the worst feeling in the world when you send proposals after discovery calls and your prospective client doesn’t open them. What you might not realize (until it’s too late and they’ve hired someone else) is that your emails might be going straight into the spam folder NEVER TO BE SEEN. Use my 3 step process to ensure that your emails are going to your client’s inbox and NOT their spam folder.
It’s heartbreaking when I hear the stories of people losing thousands of dollars in revenue in their business because their client never saw their proposals or appointment confirmations and reminders. If you’ve been experiencing email deliverability issues with your Dubsado account, you aren’t alone. I’ve been seeing a lot of messages in the Dubsado Facebook group about messages sent from Dubsado getting lost in spam filters. That’s a really scary idea to me. Many people don’t check their spam folders often (if ever).
If your email messages are going to spam it could mean…
- lost revenue
- lost clients
- poor client experience
- stalled projects because clients didn’t get your email
- sitting in Zoom meetings waiting for clients who don’t show up because they never got the reminders.
My clients have been experiencing similar issues and have asked me about improving their email deliverability, so I decided to start doing some research on how to solve the problem. Dubsado has a great article on that topic, but it doesn’t cover EVERYTHING that you might need to do to keep your email from getting lost (especially if you use Google Workspace, Outlook 365, or email marketing software with Dubsado.) I definitely recommend checking it out, there are some fantastic additional tips that can help improve your deliverability. It also doesn’t give you tools to help you get the job done or check to make sure that things are working right. I did some digging and found those tools to help you improve your email deliverability.
 and Stay Out of the Spam Folder")
Note: Keep in mind that I’m not the subject matter expert on this and this post won’t cover every situation. There are a ton of variables. Ensure that you check any settings that you change by using something like Mx Toolbox Email Health Checker and by sending and receiving test emails using your Dubsado account (and any other services covered by your SPF record like your email marketing software which we will talk about later.)
Why are my Email Messages Going to Spam in the First Place?
Spam is a real problem with email and it’s only gotten worse in recent years. Unfortunately, some unscrupulous people are using business email accounts to trick people into giving them their information or into sending them money. Because of this, email service providers have had to up their spam filter game to keep email users from getting spammed to death or taken advantage of.
They are constantly working on improving them, this has caused more and more legitimate email to end up in spam folders. This means that you have to jump through extra hoops to ensure that your messages get seen by your clients (and potential clients.)
The 3 Things That You Need to Do to Improve Email Deliverability
The three things that you need to do to improve email deliverability are…
Step 1. Setup and Validate your Sender Policy Framework (SPF) Record with Dubsdao
Step 2. Setup your DKIM Record
Step 3. Turn on DMARC (if you are using Google Workspace.)
Let’s go over each step in more detail.
Step 1. Setup and Validate your Sender Policy Framework (SPF)
The SPF Record tells email providers which domains are authorized to send emails on your behalf. It also ensures that your messages are delivered correctly. It’s pretty simple to set up in most cases.
How to Setup Your SPF Record
Step 1. Check Dubsado to See if you Actually Need to do Anything.
If you are ONLY using a Gmail account and sending through Dubsado, your SPF record setup should be handled for you. Simply log in to your Dubsado account and check to see if your SPF record has been verified.
To check your SPF record status in Dubsado, log into your account, click the settings wheel in the upper right corner, click email settings and look to see if you have a green checkmark saying that your SPF has been validated. (If it’s orange or red instead of green, then go on to step 2.)

Step 2. Create or Modify Your SPF Record
If you have a custom domain for your website like yourdomain.com, then you’ll need to figure out if your email is hosted through your domain host (like GoDaddy or NameCheap) or a service like Google Workspace. If it’s hosted through Google Workspace or another email host, you’ll want to reach out to the email host to get your SPF record and add it to the text records in your domain host’s DNS records. (Your domain host should have instructions for finding your DNS records.
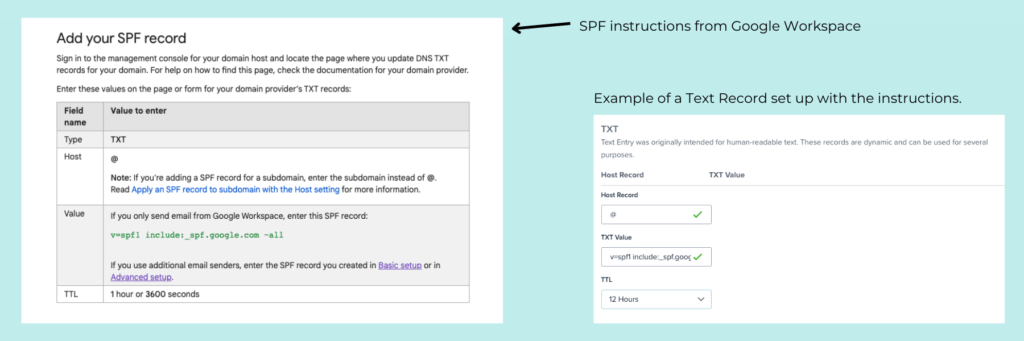
If You Have Multiple Tools Sending Emails on Your Behalf…
However, if you are using multiple programs that send email on your behalf (ex. Google Workspace, Outlook, an Email Marketing Tool like ConvertKit, and Dubsado), this is where things can get a bit complicated because you need to add instructions to your SPF record that tell email programs that these are all authorized to send for you.
Google has a couple of great articles on creating your SPF record that are geared toward Google Workspace Accounts, but the article on creating advanced SPF records has some great information on the terms that you need to know to create a custom SPF Record.
If writing your own SPF Record sounds incredibly overwhelming, I don’t blame you. (It was a bit overwhelming to me at first.) Try the MX Toolbox SPF Record Generator. You just fill in the blanks and it creates the record for you. I wrote my own using the instructions on Google and double-checked it using their Record Generator. It came out exactly the same.
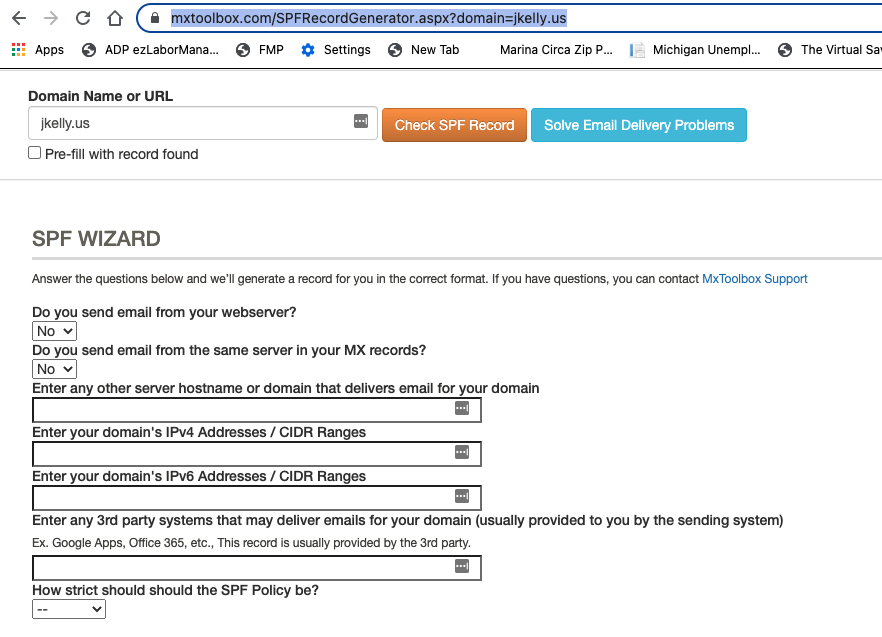
Pro Tip: You can’t have more than ten lookups in your SPF record. You might think that one domain counts as one lookup, but I found that that wasn’t true. You can fix that by referring to a website’s IP address instead. When you use that, it only counts as one lookup.
Step 2. Setup your DomainKeys Identified Mail Standard (DKIM) Record
The DKIM is a signature that tells the email provider that it’s really you. It also verifies that no one changed your message after you sent it. This is done for you if you’re using Gmail with Dubsado.
Step 1. set up your DKIM record in Dubsado
In Dubsado, go to Settings >> Emails.
- Under Email Deliverability, expand DomainKeys Identified Mail.
- Enter your domain name.
- Select a key size. Check with your domain host to see which size is supported. 2048-bit keys are the most secure.
- Click Generate.
Pro Tip: Leave the email window in Dubsado open to make it easier to verify your DKIM in step two. Be sure to copy the key to make it easier to paste into the TXT record on step 2.
Step 2. Create a TXT record in your DNS settings for your domain host. (Your domain host should have instructions on how to find this.)
- Log into your domain host and find your DNS settings.
- Add a new DNS record.
- Choose TXT for the type.
- In the Name field paste the TXT record name from Dubsado
- In the Data or Value field paste the DKIM record generated by Dubsado.
- Make sure to save your changes.
- Verify your DKIM record in Dubsado. Click verify.
Pro Tip: You may receive an error message even if you did it right. Sometimes it can take up to 48 hours for the new record to show up across the internet.
Step 3. Set up DMARC (Optional) Wait at least 48 hours after completing Steps 1 and 2.
This step is really more for people who are using email hosts like Google Workspace. It protects against spoofing & phishing and further prevents your email messages from being marked as spam. It also allows you to get reports sent on your emails. To learn more about it, read this article.
Important: Before you set up DMARC, you need to have SPF and DKIM set up for your domain for at least 48 hours.
This is a great article from Google on the steps to take before you set up DMARC. DMARC records can be really overwhelming. I discovered that MX Toolbox also has a tool to create a DMARC record. This will generate a DMARC record for you.
If you set up DMARC, it’s a good idea to enable reporting from domains that send on your behalf. These can be a bit overwhelming, so it’s a good idea to use a report aggregator like MX Toolbox to avoid getting a ton of reports every single day.
Bonus Step: Run a Check on Your Email Deliverability
Use a tool to see how your actions have improved your email deliverability. (Also to make sure there aren’t any errors with the SPF record that you created.) For most accounts MX Toolbox’s email deliverability checker is a great option.
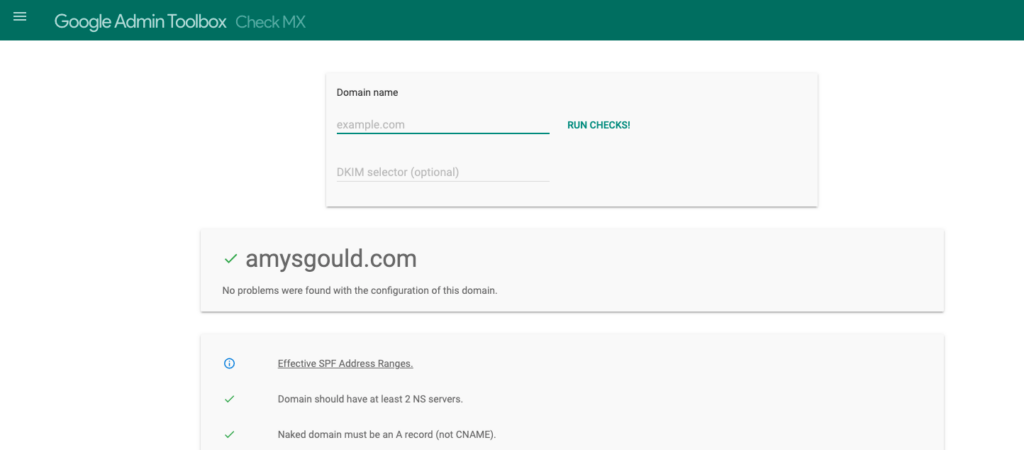
Pro Tip for Google Workspace Accounts: If you use MX Toolbox to check your email deliverability, you’ll get a bunch of errors that say “Reverse DNS does not match SMTP banner.”
Try running a check of your domain with Google’s Check MX Tool instead. It’s built to understand Google Workspaces’ setup.
Additional Tips to Improve Email Deliverability
- Avoid subject lines that look spammy.
- Send an introduction email when you first meet a client. Ask for a quick response or ask a question that they’ll need to answer. Responding to your message automatically keeps your email out of the spam folder (unless they mark it as spam.)
- When you meet with clients, let them know you’ll be sending an email from (your email address here). Ask them to add it to their address book to avoid having it stuck in the spam folder.
- If email deliverability is still an issue, ask clients to create a rule that forces their email software to send your emails to their inbox.
To Wrap it Up
Follow my three steps to improve your email deliverability and you should be well on your way to avoiding the spam folder. If you’d like help with your email deliverability and don’t want to do it yourself, schedule an hour with me. We’ll run a report to check your current email deliverability and fix any issues we find. Then we’ll run a test to make sure everything is working correctly. (I include an email deliverability check as a part of my Done for You Dubsado Setup Service.)
")

")
 (1)")

+ view comments . . .