I absolutely love the Dubsado Client Portal. I think it’s a great tool to share information with clients (and possibly eliminate work for you.) However, I do think it’s important to consider how you plan to use it in your business and if it’s a good fit for your clients. Those are pretty much questions that only you can answer.
Let’s dig into the pros and cons of the Dubsado client portal.
Here’s What We’re Talking About in This Post
What is the Dubsado Client Portal
Tips to Make the Best Use of Your Client Portal
Let’s get started…

What is the Dubsado Client Portal
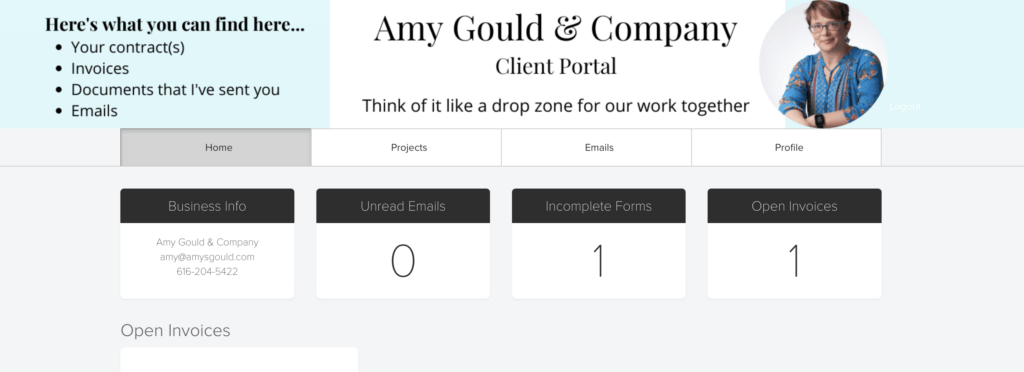
Dubsado offers a client portal. It collects everything that’s been sent to the client in one place. It’s great for giving your clients one place to look for everything. There are four tabs inside the portal. Home, Projects, Emails, and Profile.
The Home Page gives clients an overview of anything that needs action including open invoices, incomplete forms, and unread emails.
The Projects Page (which can be renamed to something that makes more sense for your business) has a drop-down that allows clients to select an individual project from the list of projects they’ve had with you. They can then look at specific forms and invoices for that project.
On the Emails Page, your clients can see all email communications that have been sent about this project. However, it doesn’t let them send emails from this tab.
The Profile Page lets clients view and update their contact information.

There are Two Ways You can Activate the Client Portal
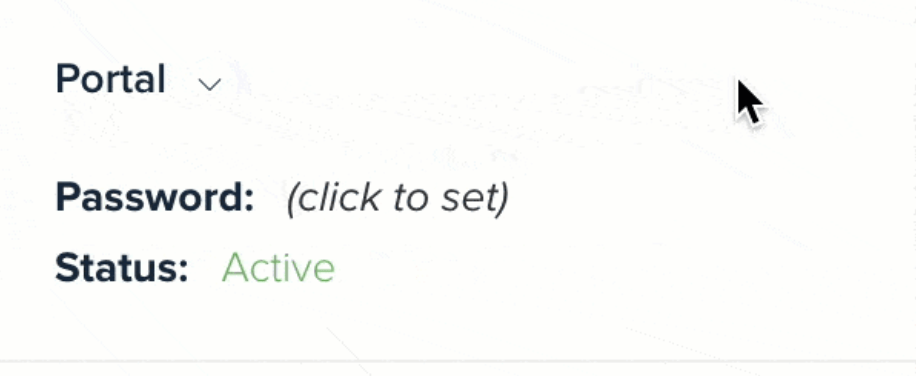
- Inside the Client’s Project – You can manually activate and de-activate the client portal inside of each client’s project. Just click Projects, and click on the client. Then look at the left-hand side of the screen and scroll down to the Client Portal section. Click the drop-down arrow next to Client Portal and select activate.
- Automatically with a Workflow – The easiest way to do it is by adding a step to your workflow to activate the client portal. (This way you eliminate yet another thing from your to-do list.)

Setting Up & Customizing Your Dubsado Client Portal
To customize your Dubsado client portal, you’ll need to click the settings gear inside of your Dubsado account. Then select Portals. You can set the following settings.
- The Client Portal Welcome Message I usually turn this off because I don’t want it to appear over the Client Portal graphic.
- Portal Projects Label Override This is a kind of confusing label. Change this to whatever you want the Projects tab to be called.
- Portal Specific Logo Got a different version of your logo that you want used for your Client Portal? Upload it here. Otherwise, skip this.
- Portal Banner and Mobile Device Banner Create graphics for your client portal that’ll work when someone accesses from a larger screen (Desktop) or a smaller screen (Mobile.) Get my client portal banner templates.
- Portal Banner Color You can choose just a solid color for your client portal if you want.
- Portal Banner Font Color This sets the color for your welcome message and the Logout text.
- Portal Summary Header Color and Portal Summary Header Font Color These set the background color and font color for the tabs you see when you first login called Business Info, Unread Emails, Incomplete Forms, and Open Invoices). This is a great place to use your brand colors or a secondary complimentary brand color.
Once you’ve got everything set, be sure to login to your client portal as a client to see how it looks for your clients. You might have to tweak some things with the header graphics.
Get my FREE Canva Dubsado Client Portal Graphics
Send me the templates
We respect your privacy. Unsubscribe at anytime.
How to See Your Client Portal From the Clients Perspective
Thankfully, this is pretty easy to do. Simply go to the projects page. Choose a project and scroll down to the Client Portal area on the left side of the screen. (The one we just used to activate the client portal.) If you click the arrow now, you’ll see view client portal. Before you do that, copy the client’s email address so you can login on the next screen. Now click view client portal. Paste the clients email into the login and you’ll see the client portal.
Be sure to check the following
- The header graphics look good.
- The font color on Login/Logout contrasts enough to make it visible.
- You’re happy with your choice of banner and font colors.
Pros of the Dubsado Client Portal
- Your clients can go to one location and see invoices, appointments, all projects they’ve done with you, and personal information they’ve provided you (name, address, phone, email, etc.). They can edit their information inside the portal, see all email communication, contracts, proposals, forms, and questionnaires that have been sent to them, and shared task boards. (Task boards are Trello like boards that you can manually create and share with clients.)
- You can use workflows to add several items to the client portal and then email the client to check their Dubsado client portal to complete the forms that you’ve added. This avoids sending a bunch of emails with one from each.
- You can upload several things to the client portal using workflow steps and share one link with clients.
- You can make forms private (so anyone who accesses it will need a password.)
- It gives clients who have multiple projects with you one place to keep track of all those projects and all the forms and information that go with them.

Cons of the Dubsado Client Portal
- It’s another link for your clients to go to (and keep track of.) Some people don’t want another website and password to keep track of.
- You’re limited to items that have been sent to the client. (You can send things through the workflow that ONLY go to the Dubsado Client Portal so you don’t actually have to send a bunch of emails to the client to get the forms/docs in their client portal.)
- You can’t add links or customize the client portal beyond just the login page, header, and name for the Projects page.
- If you don’t send a lot of forms and information to your clients, it’s an extra step to send them to the client portal instead of just opening an email with a button to click to view the item.
Tips to Make the Best Use of Your Dubsado Client Portal
Tip 1. Customize your client portal to reflect your brand and make clients feel welcome.
Tip 2. Make it easy for clients to find the client portal by embedding it or linking to it from your website menu and adding a link to your email signature.
Tip 3. Send a Client Portal Guide or video tour showing clients around the client portal and what they can find there.
Tip 4. Reference the Client Portal in emails when you send forms to clients and link to it. Recommend that they bookmark the client portal to make it easy to find things later. This is especially helpful if you have long forms that clients will want to save and work on over time. (Wedding planners, I’m talking to you here.)
Tip 5. If clients email you asking where they can find things, you can send them the link to the client portal. However, I recommend not doing that all the time. It doesn’t take that much longer to send a link to the form, invoice or contract requested.
Tip 6. Create a document call Important Links and Information if you’d like to share links with clients. Add all the important links to the form. Then add a workflow step to automatically add it to every client portal after they’ve booked with you.
Those Are My Tips to Brand Your Dubsado Client Portal
I hope you found it helpful and it gave you a few things to consider when deciding whether or not to use the Dubsado Client Portal. If you’d like to learn how you could use Dubsado to streamline your business (including using the client portal),book a free 15 minute Systems Strategy Call with me.

+ view comments . . .