


Stress-free mini-session booking can seem like an oxymoron, but with Dubsado’s CRM software, you can take the anxiety out of scheduling and delivering minis and save yourself hours at the same time.
Mini-sessions are an amazing way to boost your business income in the offseason by creating a lower ticket offering and doing a bunch of shoots all at once. (It’s also a great way for new clients to get to know you too.) However, they can be WAAAAYYY more work than they’re worth if you’re doing everything by hand.
You end up…
- sending a bunch of back-and-forth emails to schedule appointments.
- sending more emails to answer questions.
- creating contracts by hand and sending them.
- invoicing clients and sending reminders to collect payments.
- writing emails to let clients know when their photos will be ready.
- sharing the photo link when they are.
- remembering to ask for referrals and testimonials…
It’s a giant headache!
I can help to take the load off your plate with Dubsado automation and a clear system. (The best part is you can try Dubsado out for free for the first three clients. This means you can set up and book your mini-sessions for the first three clients BEFORE you pay a dime to use the software.)
This post will lay out an easy way to easily set up stress-free mini-session booking software so you can focus on delivering amazing sessions to your client. Your clients can book the session, pay, get reminders, and other information (including their photo link) without you doing anything because of Dubsado automations! It’s going to make your mini-sessions super easy to set up and manage.
Sound too good to be true? Keep reading?
If you aren’t a photographer, you might want to check this out too. The mini-session format can be useful for other services too. There are lots of ways to use this concept to deliver a lower ticket service without creating a ton of extra work for yourself.
Mini-Sessions Aren’t Just for Photographers
Mini-sessions are a concept that can be modified for other businesses as well. This idea works well for any service where you want to book up front with a fee and generally don’t need to hop on a call first. Here are a few ideas for different businesses.
- Home staging consultations
- Design consultations
- Dubsado audit for Dubsado pros
- Dog grooming appointments
- Coaching for single-issue sessions
- VIP Days for almost anyone who uses a VIP day.

Steps to Set up Your Stress-free Mini-Session Booking Software in Dubsado
We’ll go over each step in detail, but here’s the basic roadmap for setting up your mini-sessions.
- Determine your location, dates, times, and theme.
- Create your project tags and statuses.
- Create a lead capture form (or proposal) and connect it to your scheduler.
- Set up your scheduler with a payment required to book.
- (Optional) Add a mini-session contract
- Write emails
- Create workflows
- Test
Choose a Location and Other Details for Your Mini-Sessions
Before you start setting up your mini-session or creating a landing page on your website, decide the dates, times, location, and theme for your mini-sessions. To keep questions to a minimum, include the address and a link to a Google map and website. If needed, add a foul weather location. To create the most ease in your mini-session process, start with a well-laid-out landing page.
Here are a few tips.
- Take a few minutes to think about frequently asked questions for mini sessions and consider writing an FAQ section on your landing page.
- Describe the theme and setting to help clients visualize their photos. Set the expectation right away with the number of outfits, poses, and photos they can expect to receive in this package.
- Other ideas for the landing page are past photos from a similar theme or location, Photos of the actual location, an about me section, and testimonials from past mini-sessions.
Pro Tip: A great add-on for this service is a flier with tips for dressing for the theme or a photography shoot in general. Accessory ideas and tips for getting the best photographs.
Decide on Your Overall Workflow
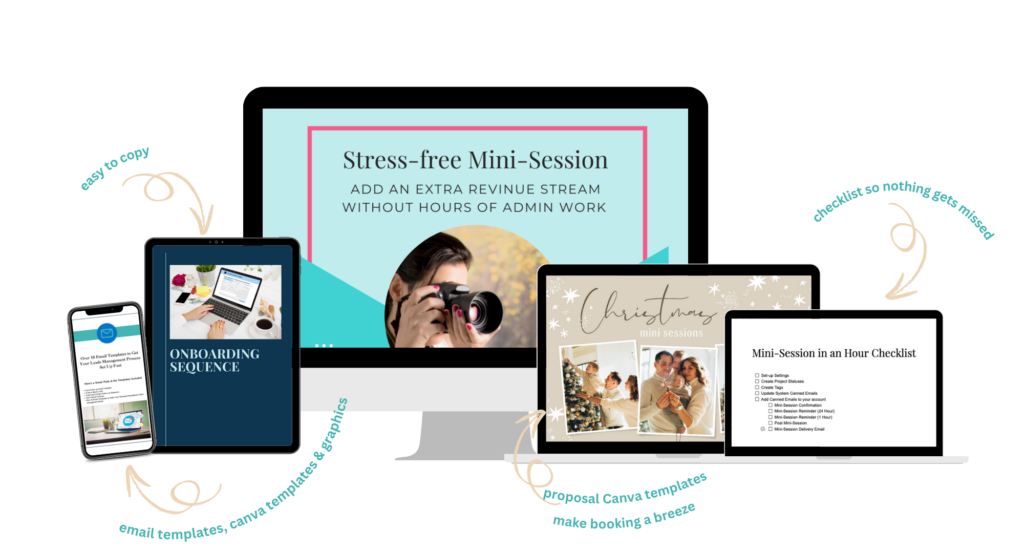
There’s more than one way to set up a mini-session. Take a look at these overall workflows for mini-sessions and decide which way you’d like to go. (There’s a cool gallery below. Check it out.) I go into how to set this all up in great depth inside of my Stress-free Mini Session in an Hour course. Get all the email templates, graphics and form templates to make setting up your mini-sessions a breeze.
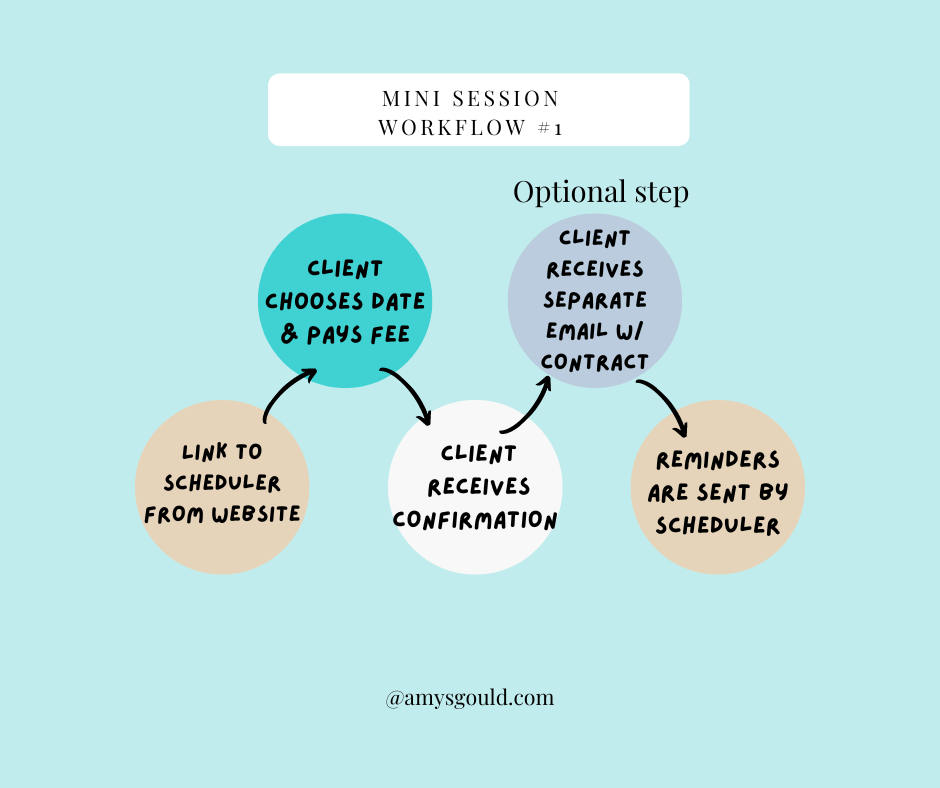
Workflow #1
This workflow links to the scheduler from your website. The client chooses a date and time that works for them. Then they pay 100% of the fee upfront to secure the booking.
Pros: Simple and easy to set up
Cons: If the client books a date and doesn’t pay, they can end up thinking they have a date booked, but it’s not booked. (I have a way to avoid this, but it’s amazing how often this can get messed up.)
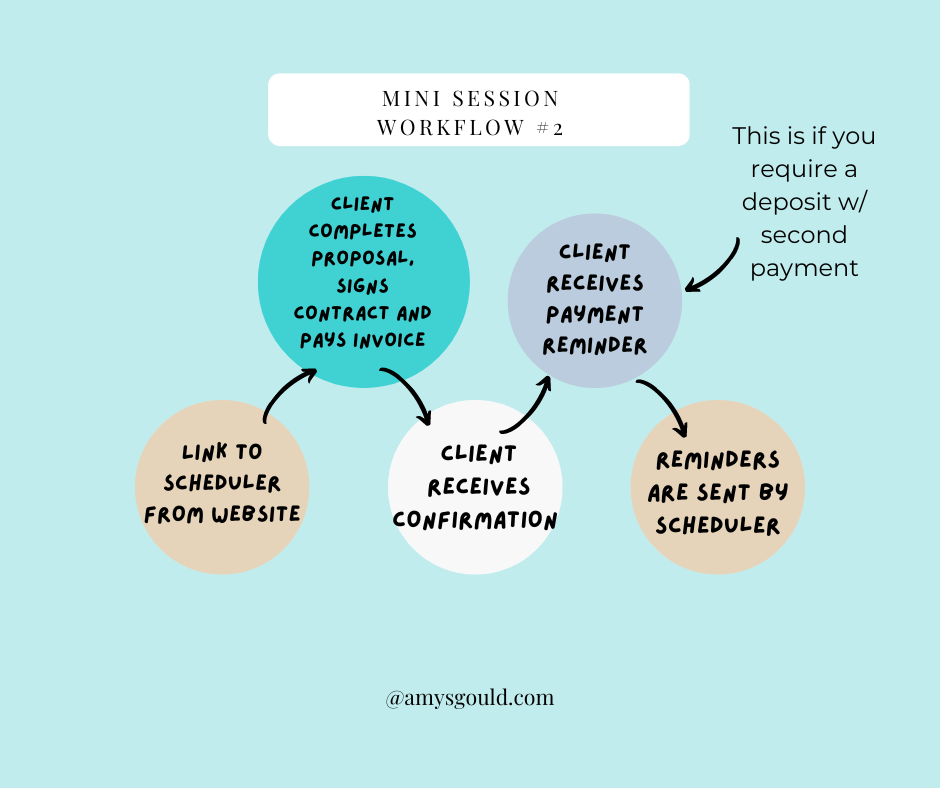
Workflow #2
This workflow links to the scheduler from your website. The client chooses a date and is presented with a proposal. It then gives them a contract and invoice.
Pros: More complicated to set up. Allows for you to ask clients to pay a deposit and collect a second payment.
Cons: This is a bit trickier to set up because you have to set up the payment plan correctly. (I strongly recommend testing if you use this workflow.)
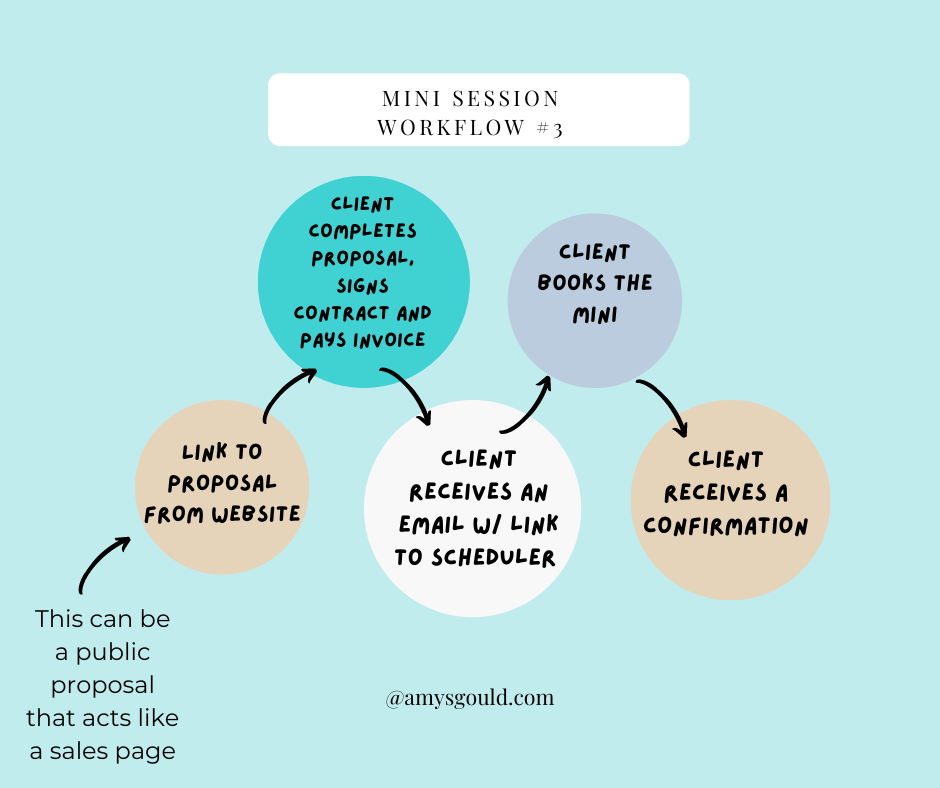
Workflow #3
This workflow links to a proposal from your website (or you can use the proposal like a landing page alone.) This is a way to sell mini-sessions if you don’t have a website yet, because you can design a landing page-like flow on the proposal and link directly to it.
Pros: Simple to set up, allows you to present a contract, and avoid the cons of workflow #1.
Cons: More steps are required to sell the mini-session.
Create your Lead Capture Form or Proposal
Here’s where you need to make a decision. If you’d like to automatically include a contract with your mini-session sign-up, you can opt to use a proposal connected to the scheduler. This requires more steps and is a bit more complicated. I’ll go into detail in a separate section.
When considering your lead capture form, keep in mind that you don’t just have to use fields. You have options with the new form builder such as columns, images, text, and even file uploaders. It’s a great opportunity to design something that represents the theme and gets your prospective clients excited about their mini-session.
Be sure to have the form kick off your abandoned cart workflow (you’ll have to go back to set this up after you create your workflows.)

Create Project Statuses and Tags
This step helps you to keep things organized in your Dubsado account. Create a tag for Mini-Sessions 2022.
Then create statuses for leads and jobs.
LEAD STATUSES
- Mini-session booking
- Abandoned cart
JOB STATUSES
- Mini-session scheduled
- Editing
- Delivered
Note: If you don’t want to hold jobs in this status, you might want to add a Holding status as well to allow any follow-up emails to run without cluttering up active client statuses.)
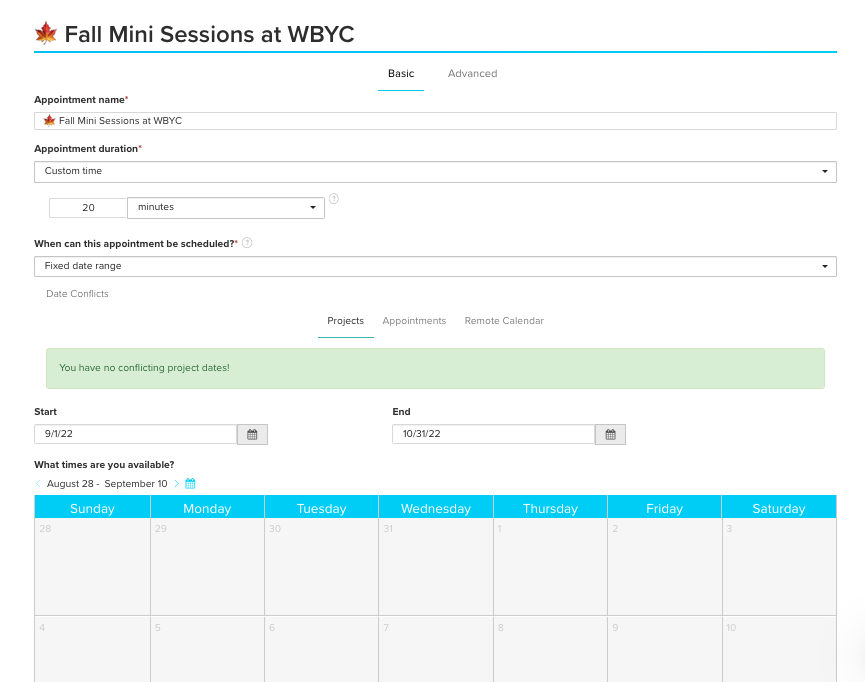
Set-up Your Scheduler
Next, we’ll set up your scheduler. Set the appointment name, and duration. Set when can this appointment be scheduled. Fixed date range (if it’s just during certain dates.) Otherwise rolling date range. Set dates and times that you chose earlier on the schedule.
Pro Tip: Be sure to set buffer time before and after each appointment. (Even if it’s just 5 minutes so you can reset and grab a quick snack.) I show you exactly how to do this inside of my Stress-free Mini-sessions in An Hour Course.
Write the Emails for your Mini-Sessions
After you set up your scheduler, write your emails.
Here’s a checklist of the emails that you’ll need to write for your mini-session workflows. Remember to add in smart fields with client names, appointment dates, times, and start times as well as form links. (I’ve got all of these templates written out for you in my Stress-free Mini-sessions in An Hour Course if you’d like to skip writing all the emails.
Pro Tip: I like to make sure to add an add-to-calendar link and cancel and reschedule links to the confirmation email as well as the reminder emails.
- Abandoned Cart email – Ex. Hi, I see you started booking a mini-session, but didn’t pay yet, if you’re still interested, click the scheduler link below to select a new date and time and pay your fee to lock in your date and time before someone else grabs it up.
- Mini Session Confirmation – Ex. Hi, your mini-session is booked! Here are the details for your appointment. (Be sure to add the smart fields for the appointment start date and start time as well as a link to add it to your calendar and links to cancel and reschedule.)
- Contract email – (Optional) Ex. Here’s the contract for our mini-session together. Please sign it so we can get started working together.
- Style Guide- (Optional) Ex. Here are some great tips to help you prepare for your mini-session with me. This is a great example of a mini-session style guide. Tip: Create a blog post or website page to link to. This way if you update it, you don’t have to update your workflow.
- Reminder to sign the contract
- Mini session reminder emails. Ex. See you tomorrow (date) for your mini-session at (time). In case you missed it, here’s my mini-session style guide (insert link.)
- Mini session follow-up, thank you, what to expect next, when photos will be done, and how they’ll be delivered. Ex. I had the best time photographing you and your family yesterday. I’m busy working on your photos and will get back to you in 2-3 weeks when they’re ready. You’ll get a link to your personal mini-session gallery where you can order prints and more.
- Gallery delivery email. Hi, here’s your mini-session gallery! Ex. Check out the amazing photos from our time together! Let me know what you think!
- An email asking your client if they’d like to re-book next year. (Optional) Ex. Can you believe it’s been almost a year since our last mini-session together? I’m getting ready to book mini-sessions for this year, would you like to join me? (Link to mini-session scheduler.)
Set-up Your Workflows
Finally, we’re to the best part (in my opinion)! Automation! Here’s the magic that takes the work off your plate! You’re going to love it! There are two workflows. The abandoned cart workflow and the mini-session workflow.
We’re actually going to start with the cart abandonment workflow. This may seem counterintuitive but hang with me for a second…
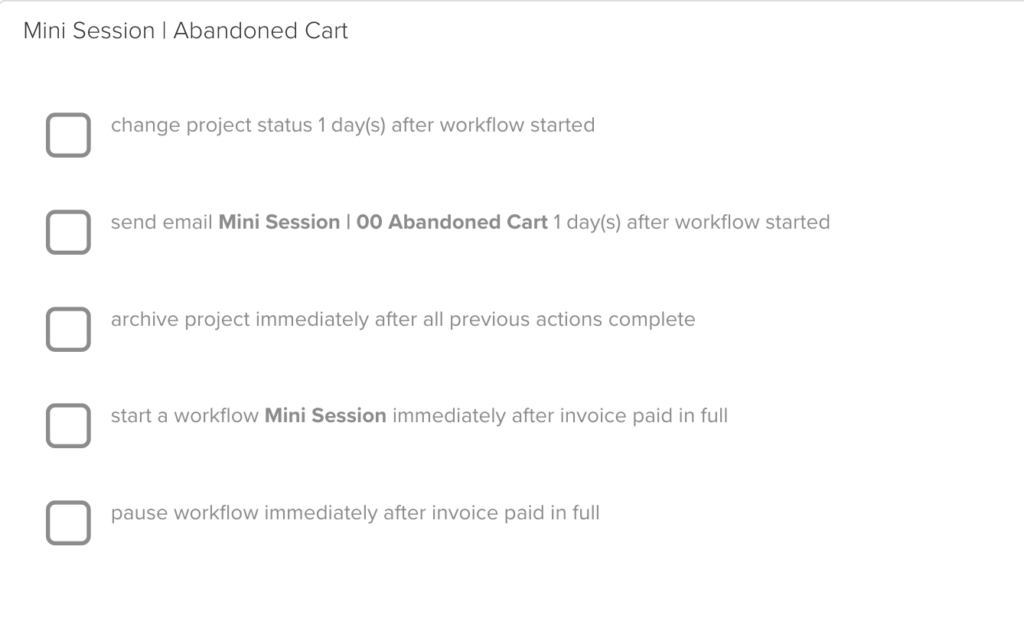
Workflow #1. The Cart Abandonment Workflow
This workflow actually begins with your lead capture form on your scheduler. It automatically stops once the invoice is paid. It’s an essential part of the process, especially with the way that the scheduler requires payment to book the mini session. If someone chooses a date and doesn’t pay, they will get a reminder to go back and re-book with a link to the scheduler (not the invoice.) This way you don’t end up with paid invoices and missing appointments. (This is what happens if someone goes back and pays the invoice later.) All this to say, don’t skip this workflow!!
Abandoned Cart Workflow Steps
Step 1. Change the project to Abandoned Cart 1 day after the workflow has started.
Step 2. Send the abandoned cart email 1 day after the workflow is started. (Don’t worry, this workflow stops immediately after the invoice is paid in full.)
Step 3. Archive the project immediately after all previous actions are complete (If the client comes back, chooses another date, and pays the fee, you don’t end up with duplicate clients.)
Step 4. Start the Mini Session workflow immediately after the invoice is paid in full.
Step 5. Pause the workflow immediately after the invoice is paid in full. You could make this step .12 hours after the invoice is paid in full to ensure that it won’t pause before starting the mini-session workflow.
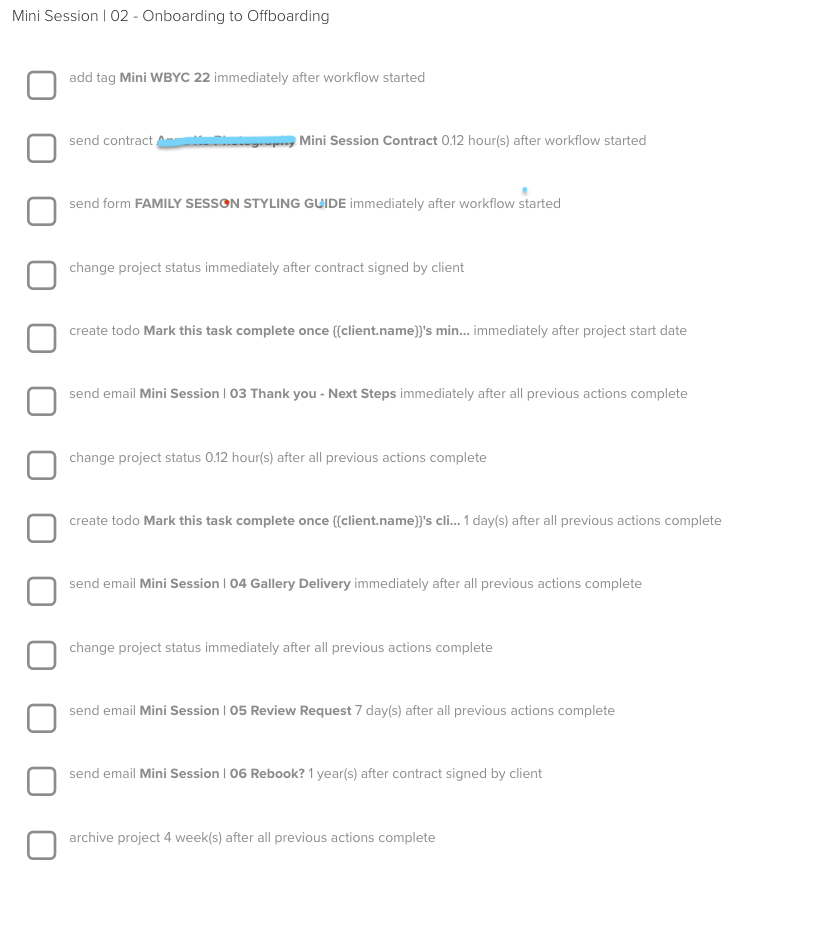
Workflow #2. The Mini-Session Workflow
This workflow automates the client journey from onboarding through offboarding and even asking for a testimonial and rebooking if you choose.
Your Mini-Sessions Workflow Steps
Step 1. Add tag Mini-session 22 (or whatever you’ve called it. In this example it includes an abbreviation for the location.) immediately after the workflow has started.
Step 2. (optional) send contract .12 hours after the workflow started (if you use the proposal options or don’t wish to include a contract, skip this step.)
Step 3. Send Email Family Session Styling Guide (this client chose to send a form in Dubsado instead, but I prefer to link to either a Canva file or a website because you don’t have to update the workflow when you make the change to the Dubsado form.)
Step 4. Change project status to scheduled after the contract is signed (if not using a contract, choose after the invoice is paid instead.)
Step 5. Create a to-do immediately after the project start date (include client’s name in the to do to mark this task complete after the mini-session is completed.)
Step 6. Send email Mini-Session Thank you and next steps immmediately after all previous actions complete.
Step 7. Change project status to Editing .12 hours after all previous actions are complete.
Step 8. Create to-do (client first name) mark this task complete to deliver photos.
Step 9. Send delivery email immedately after all previous actions are complete.
Step 10. Change project status immediately after all previous actions completed to delivered.
Step 11. Send review request email 7 days after all previous actions are complete.
Step 12. Send a re-book email 9 months after all previous actions are complete.
Test Everything Before You Promote Your Mini-Sessions!
Now that you’ve set everything test your setup with your own email address. Let me say it again.
Test everything!
There are two reasons for this, first of all, you’ll find any bugs in your setup and make sure everything is functioning correctly. Second of all, you’ll build confidence that your system works because you’ll see it firsthand.
The Best Way I’ve Found to Test Your Mini-Session Booking System Setup
My favorite way to test a workflow is to visit the link to the scheduler from my smartphone with Dubsado and my business email open on my laptop. Do all the things that the client would do from my phone and do all the things that I would do as the business owner from my laptop.
This way, Dubsado will treat the visits from your phone as if you were a client (if you do it from your computer, you have to use an incognito window or Dubsado will recognize you and some things won’t work.)

Add your Mini-Sessions to your Website
The last step to setting up your mini-sessions is to add your scheduler (or proposal link on your website, promotional emails, and social media posts.) You can do this by clicking the share button and copying and pasting the link (and using a button on your website linked to the form) or clicking the embed code area and copying and pasting it into your website. (Follow your specific website hostes directions.)
Enjoy your new stress-free mini-session booking software setup in Dubsado!
I’m sure it’ll save you a lot of time and make managing them so much easier. If all of this has your head spinning and you’d like some help getting this all set up in Dubsado, be sure to grab my Stress-free Mini-Sessions in an Hour course. It has a checklist to help you stay on track, email templates (pre-filled with all the links you need to make your workflows pre-populate with forms and schedulers), templates step-by-step instructions and more.

")


[…] piece that I love is my mini sessions workflow that you built for me. Mini-Sessions have always really stressed me out. there’s so much back and […]