


Have you been wanting to send client gifts, but can’t find the time. Do you have boxes of stuff to put together your own client gifts and a lot of good intentions? Do you have a stack of thank you cards on your desk that have yet to be mailed because you need to find time to handwrite messages and addresses on the cards? You’re going to want to read this post and watch the accompanying YouTube video walking you through how to set-up my very favorite Zap EVER!!
It involves an app called Handwrytten. I LOVE this company! They have robots that handwrite cards and send them for you! It’s GENIUS! You can even send gift cards and things in the envelope! I especially love this because most of us are just used to getting junk mail and bills, so when we get a real honest to goodness card from someone, it’s kind of a big deal!
So if you haven’t already done so, head to Handwrytten.com and have a look around. If you’re ready to automate sending client gifts, keep reading!
I’ll walk you through the process of setting up my favorite ZAP and show you how to automatically send your clients a card at a specific point in your client experience. It get’s me SO many awesome emails from my clients so I know you’re going to get lots of great feedback from your clients too!
Even better, I’m giving you my Zap template for free so you can get this awesome Zap up and running in your business too. Grab it Here.

Once you get the template, walk through the steps below to connect the Zap steps to your system. You can also watch my YouTube video below to see me walk through it.
Step 1: Setting Up ZAP with Dubsado
To begin, click into the first step of the Zap. You’ll see that the first step is set up to trigger when a contract is signed in Dubsado. If this is the trigger you want, click continue. (If not, choose a different trigger and click continue.) Then you’ll need to grab your API key from the Integrations menu in your settings area in Dubsado. Need more directions on how to do this? Read this.
Once you’ve done that, Zapier should pull in your Dubsado account (or accounts) if you have more than one. Select the appropriate account and click continue.
Zapier will prompt you to select a record from your setup to test with. Don’t worry, this is only a test and no card will be sent. Just pick a record you want to continue with and move on. Then click test. If there’s an error on the Zap try re-running the test or go back and check your work so far before re-running the test.
Step 2: (Optional) Filter by Zapier
If you want to filter out certain individuals from receiving a client gift, you can add a step called “filter by Zapier.” This optional step allows you to rule out people who shouldn’t receive a card, such as referral partners or casual coffee chat acquaintances. If you don’t want to filter people out, you can delete this step in the template.
In this template, I set it up to filter based on the project workflow’s name. You have other options to choose from in your filter. I recommend using the Text (Contains) over the Text (Exactly Matches) because it’s tough to get an exact match and you may end up accidentally excluding people.
After setting up the filters, click continue, and ZAP will ask you to test the connection. Test your filter and see if you get the expected result based on the test person chosen earlier.
Step 3: Connecting Handwrytten to Zapier
Click into the third step, then decide what action you want Zapier to take. You can choose to…
- send a card
- add an order to a basket
- create a contact
- schedule a card.
For this guide, we’ll focus on sending a card. Click send card and click continue. Next, login to your Handwrytten account and allow Zapier to have access.
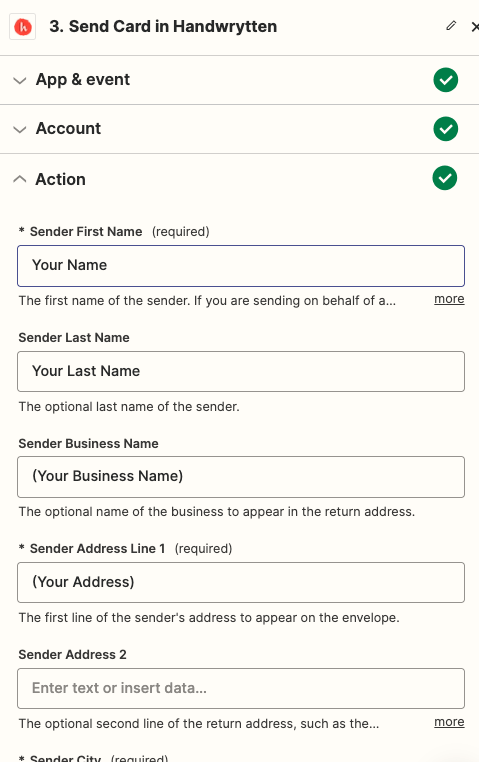
Step 4: Sending the Card with Handwrytten
This is probably the most labor intensive part of setting up the Zap. The good news is, once you’ve done it once, Zapier will do this all for you!
Step 1. Fill in your business information in the sender fields.
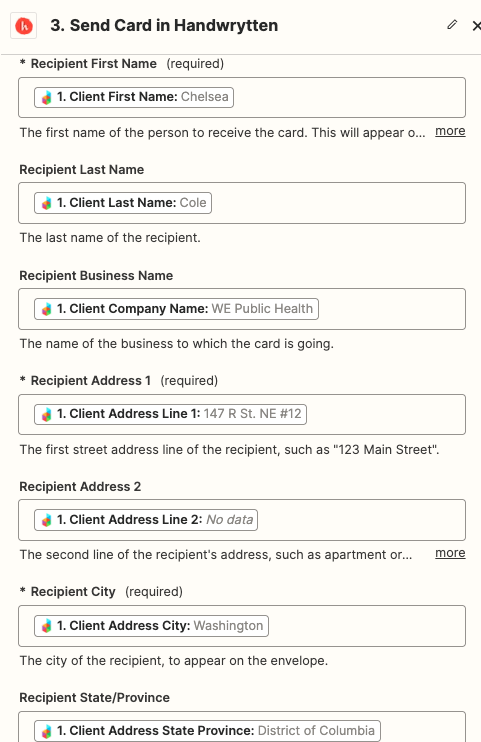
Step 2. Select the fields from the contract signed in Dubsado step to auto fill in the information for your client from Dubsado in the matching Recipient fields.
Step 3. Set up your card selections, message and any inclusions you’d like in your card. (See directions below.)
Step 4. Choose your billing options.

Choose Your Card Style
Handwrytten offers various customization options for your card. You can choose from a selection of pre-designed cards or create a custom card with your own design. Take a moment to browse the available designs and select one that suits your brand.
Choose Your Writing Style
Next, choose a writing style that best represents your business persona. You can find these on the Handwrytten site as well.
Write Your Message
In the message section, you have the opportunity to include information from Dubsado, such as the client’s first name, to personalize the message further. Craft your message carefully, ensuring it conveys your gratitude and professionalism. Don’t forget to add a sign-off at the end.
Add a Gift (Optional, But Fun!)
If you want to go the extra mile, Handwrytten allows you to include a gift card or a custom insert with your card. There are various gift cards, options and denominations to choose from.
Last, but not least, you can decide whether you want delivery confirmation for your card.
Finish the set-up by entering your billing preference
To complete the setup process, enter the credit card information you want to use from your billing settings in Handwritten. Once everything is ready, click continue. I’d skip the testing option at this point, because the test will generate a card in Handwrytten. (If you chose an actual client to test with and you want to send them a card, go ahead and hit test. Then name and publish your Zap.
Tip: As you create more Zaps for yourself, you’re going to want to make sure to name and organize your Zaps so you know what each one does.
That’s How Easy it Is to Create a Zap to Automatically Send Client Gifts
Congratulations! You’ve successfully set up my favorite ZAP to automatically send client gifts/notes. This is just one of the things that you can do to automate your client experience while maintaining the personal touch that sets you apart. If you’d like me to help you find more opportunities to harness the power of automation in your business, apply for a 90 minute strategy session with me.
If you added this Zap, I’d love to hear from you! Tag me on Instagram at @amysgould_ with a screenshot of your card or Zap and tell me how much you love this!

")


+ view comments . . .